
As you may recall, in this ongoing saga, when the refrigeration specialist visited us, he diagnosed excess refrigerant as the cause of our frustrations with the fridge refusing to cycle. After bleeding off some refrigerant, the fridge cycled perfectly. But then he recommended removing the speed resistor to decrease the amps per hour from 6 to 3 (read the post 1/2 the Amps? here). He also recommended installing a spillover kit to lower the temperature on our “cooler” (formerly known as the ice box) – here’s that post.
Anchored out, we tried the new setup, and sure enough, as many readers pointed out, we may only use 3 amps per hour, but now it runs 24/7. Here’s the update post. We added insulation, not only to the cooler side as originally planned, but redid all the insulation on both sides.
But now the Adler Barber Cold Plate – different than a Cold Machine – literally needs defrosting every two weeks. Doing some research we found that the reason a cold plate frosts up is there’s warm moist air getting in from somewhere. Well no kidding – the spillover kit fan blows the air in from the cooler side to be chilled and then it goes out a hole back into the cooler side. So that air circulation is causing the plate to frost up quickly. We reread the instructions to make sure we had the spillover fan turned the correct way, it makes no sense to me why it should be blowing IN to the freezer and not the other way around, but it’s installed correctly.
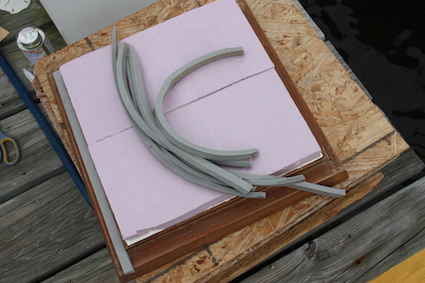
When we re-insulated, we didn’t replace the seals, because we didn’t have the correct seals. We tried weatherstripping from Home Depot, but it wasn’t working and kept coming off the lifting lids. When we returned yesterday from playing with the grandkiddos for a few days, the box with the seals was waiting. OK, another project. BTW, you should never let your refrigerator seals look like this … it’s asking for trouble! Cool air will spill out anywhere it’s easy, and we made it really easy with the almost 30 year old brittle seals.

First we removed the old seals, then sanded until the surface was free of old glue and smooth.

These seals are actually a bit too wide and make it extremely difficult to get the door to close, but we try not to use the door, and only use the top entry to keep the cold air from spilling out lower. But when we tried the new seals on the top lifting lids, the lids wouldn’t lie flush with the counter anymore…. back to square one. A boat across the dock brought over some stuff he used on his – he thinks it’s similar to what Pacific Seacraft used originally (his boat, not our Passport). So off to Home Depot, and this time, we found the same stuff Nick used.
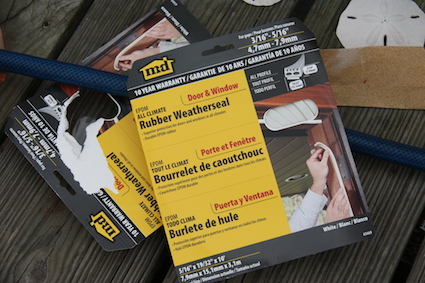
Not sure if it’ll be better than the foam weatherstripping, but looks worth a try. We removed the old weatherstripping that just wasn’t working – not a big deal, it just peeled right off.
Then we added the new weatherstripping.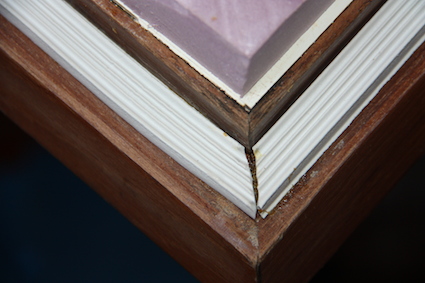
The door seals have all been replaced, so we’ll see if it reduces the moist airflow into the freezer causing the cold plate to frost up so quickly. If not, we’ll move on to theory 2 — pointing the spillover fan out of the freezer compartment. Only one variable at a time! Anyone with more thoughts? Please leave a comment. THANKS! Jan


I added the magnetic rubber stripping out of an old refrigerator with a metal strip for it to mate against. The metal strip was a Home Depot item sold to mount on walls to hang shelves.
I mounted the strips to the wall of the ice box and the rubber stripping to the lid. That helped the most.
Hi Jim! We looked at the magnetic rubber stripping, you can actually buy brand new at this website: http://www.barefrigeration.com/Category/Refrigeration/Gaskets.html But the problem was that all of them were too thick to work on our top loading doors and even our front mounted “icebox” door. The compression gasket we used on the icebox door is from this website, but when we used it for the top lids, they weren’t flush with the counter and it’s the thinnest one we could find. Keeping our fingers crossed!
We installed the same set up on our Passport. We used the original spill over hole to mount the fan to pull cold air from the freezer side to the refrigerator side (your theory 2.) Works great although we do have similar issues with the rubber seal. We replaced all the seals as you have with the same weather stripping from Home Depot. The seals are ok but because they do not provide a perfect seal we get a bit of moisture on the outside counter tops by morning. Now, at night I lay a towel over the top of both compartments to provide a bit more insulation and it helps while still searching for the perfect seals 🙂
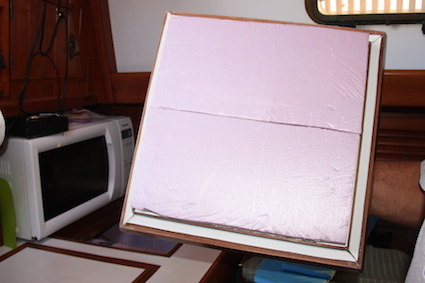
Hi Mary! We have flexible sheets of blue insulation stuff from Home Depot that I use on the inside top of the refrigerator and freezer. Laying them on the top gets rid of the condensation problem, at least for us. I can’t figure out how to post a photo here, but the top photo on this post shows how we do it. http://commutercruiser.com/refrigerator-update-12-the-amps/
Cheers! Jan
Thank you for talking about making sure your refrigeration system has the proper seals. It makes sense that doing this would not only protect your cargo but also your vehicle. It is important to remember to buy from a company that you can trust and who is professional when building these machines.