Is it time to the jib/genoa off the roller furling and store it for the season? Or put it back on the roller furling? It looks intimidating but following these step by step photo instructions will make it easy. The photos are in the order of putting the jib back on, but if you reverse them, voila – taking it off!
And DO NOT EVEN THINK about leaving a roller furling sail up for hurricane season. See Hurricane Charley to see what happens when boats leave headsails in place.
*************
Time to put the roller furling jib back on! Keep in mind, all sailors do things differently, there is no right or wrong, it’s simply how we do it. (Note: I apologize for the weird spacing, keep scrolling, I haven’t figured out what’s causing the extra blank lines yet.)
So here are our steps for putting the roller furling jib (or genoa) back on the boat after being gone all summer for hurricane season. First we wait for a very calm morning to put the jib on without having to worry about the wind catching it and causing all kinds of unneeded havoc.
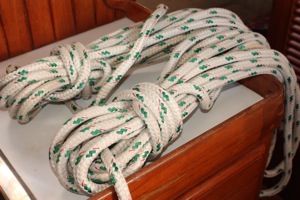
Step 1: Gather all the “stuff” you’ll need… in our case, this includes the jib lines, the jib, all necessary shackles, and an adjustable wrench. We always leave the shackles attached to the jib, just so we don’t misplace them elsewhere on this boat! It’s so easy to lose stuff over the course of six months being gone — if we leave most things in the place they go, it seems to go better…. well, most times.

Step 2: Take the jib or genoa out on deck — hopefully it’s still flaked and neatly folded inside the jib bag you put it in when you took it off. Keep in mind, it doesn’t come down like this – we flake it as best we can on the foredeck and then move it to the dock and stretch it out and flake it for real so it’s small enough to fit inside the bag.

Step 3: We put a shackle in the hole of the roller furling to keep it from accidentally spinning and releasing furling line while we’re gone for six months. Now it’s time to remove the shackle locking the roller furling and reattach it to a nearby stanchion.
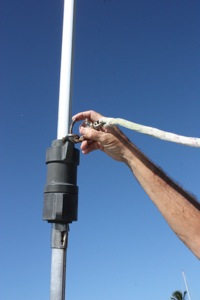
Step 4: Attach the jib halyard to the top of the roller furling car. After a summer of no use, often we have to “work” the mechanism a bit to free it up and make it function easily.
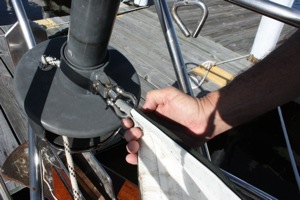
Step 5: Shackle the bottom of the jib to just above the roller furling drum as shown.
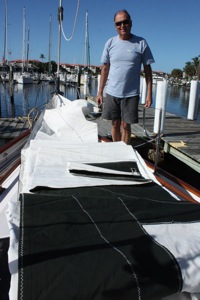
Step 6: Here the jib is pulled out of the bag, unfolded fore & aft, flaked on the foredeck, attached at the top and at the front and ready to raise. But before we can raise it, it’s good to attach the jib lines.
Note that we have a 95% working jib as our primary headsail because we’re a sloop rig and have no inner forestay for a smaller sail. When we bought the boat, we were concerned about a sloop rig instead of a cutter. Robert Perry, the boat’s designer, was our consultant and he recommended before we think about adding an inner forestay that we get a 95% jib a bit heavier weight than our 130% genoa and sail the boat for a year. Then, if we still wanted to add an inner forestay, Bob would get us some plans. Well, it’s 10 years later and our 95% jib is still going strong. The only downside is without the more powerful genoa in normal or light winds we’re always the slowest boat. We don’t always think that’s OK, but while we’re still passagemaking, we’ll keep the 95% on for the safety factor – you never know when the weather will do an abrupt about face even when not forecast.

Step 7: Now take the two jib/genoa lines to the back of the jib/genoa sail. We use a bowline with a stopper knot in the very end of the line to keep it from accidentally slipping through the bowline. You’ll have 2 lines attached as shown. Some attach the lines differently, for us, it’s just as easy to tie the knots. Knock on wood, we’ve never had one undone.
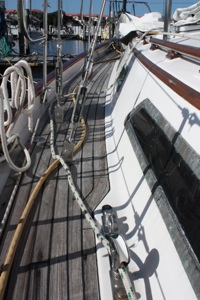
Step 8: All boats are different so you need to access where your jib/genoa lines need to run, but ours run outside the sidestays and then through the pulley on the track before proceeding back to the cockpit.

Step 9: Route the jib lines back through the back pulley, then tie a stopper knot in the end of the jib line. Then we wrap the jib line around the winch on each side to keep the jib centered on the boat when we raise the halyard. We don’t want it flopping off the side.
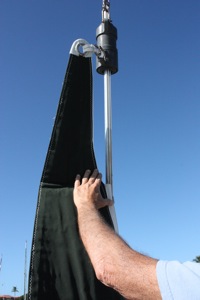
Step 10: Now we have one person on the winch raising the sail and one person at the jib, feeding the jib into the track – we have a U shaped feeder (not seen in this photo) that helps position the jib to go smoothly into the track. One person raises the halyard while the other makes sure the jib edge is feeding in smoothly.

Step 11: Center the jib and raise slowly.
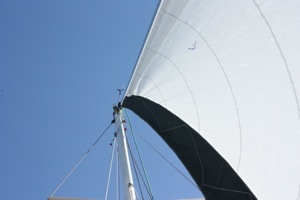
Step 12: All the way to the top. Then tighten as taunt as you can make it before closing the halyard stopper.

Step 13: Finally it’s time to roll the sail up on the furling. In this photo, David puts a bit of tension on each of the jib lines so when I roll up the jib, it rolls up nice and taunt, not loose, baggy and ready to catch extra wind.

We want it rolled taunt and finished with at least 3 extra wraps of the jib lines outside the jib UV cover. Under no circumstances would you leave a bit of jib loose and not wrapped tightly. Squall lines or just windy conditions have a bad habit of forcing furled jibs to rip or unfurl against best precautions. By winding it tightly with extra wraps, you make it more difficult for the jib to unwind unintentionally.
That’s it! It took us about an hour this year to get the jib back on, including the time to find the jib lines and set everything up. Do you do it differently? Leave a comment and let us and other learn from your experience! THX! Jan
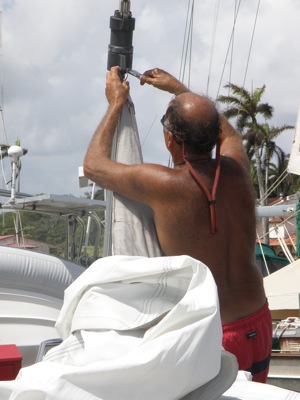






My jib re-furled, but not quite far enough. What do I do? It needs an extra turn but I don’t quite know what I should be turning.
It would seem like you need to give your furler an extra turn before you put the jib up. Either that or you can unlock the ratchet and use a tool to turn the line without the roller furler.
Just got my 30′ Hunter 1981
The mass and roller furling as just being installed, the jib went down a foot or so we tried to put it back up it would not go up so we put it down all the way and it doesn’t go up past the midway, The line is nice and free. And sail went down very easily
thank for a very simple yet informative rigging lesson.My question is do you let the line out of the furling drum as you raise the jib ?, and is that line on a spring mechanism inside the drum? I bought a new little boat this year, (aCompac 19), which came with a furling jib so I have never done this before. Thanks for your help.
Happy Day and fair winds
Don
Hi Don! Are you putting the jib on? Or is it already on? The furling line comes out when the sail gets rolled up. If the sail is out, the line is in. When the line is in, the sail is out. If you’re bending the sail on the forestay on for the first time of the year, the unfurling line is all wound up inside the drum. The Harken drum on our Passport 37 has no spring mechanism that we’re aware of – not sure about a small boat. Not sure that this makes it clearer. If you have more specific questions, David will be glad to answer, please feel free to ask! Hope this helps! Cheers! Jan
Thank you Jan and David for the info. We has a 28′ Trapper 501 sloop with a furling Genoa. We’ve had the boat about 2 years. Our Genoa was newly fitted by the previous owner and we thinks it’s about 3-4 years old. Our problem is we think it’s dropped, or we’ve unintentionally dropped it, because when she’s out it’s very hard to get her inside the guard rail where she often gets caught! We can fathom how to raise it any more, probably about 12″ or so. Can you please advise us?
Your article was very well written and photographed! 🙂
Chris and Pete
Hi Chris & Pete — it’s very difficult to determine … the roller furling itself won’t drop, it’s permanently attached. If the genoa has slid down the roller furling, it should have a lot of wrinkles on the luff (front edge). If that’s the case, you need to put the halyard on a winch and raise it back up – the last 12″ on ours is very difficult to crank up – usually David has to finish because I’m not strong enough to get the last 12″. Our roller furling 95% working jib is outside the lifelines when it’s out, except at the very bow. It sometimes gets caught as it goes over the lifelines as we roll it in, we just have to be careful. I hope this helps. Without seeing it, it’s tough to help. Cheers – Jan & David
Hi
Thank you for a very clear article. We are newbies and had a torn jib which we had repaired and re putting it back on for the first time. Do you do this in berth or out? I’m concerned about wind coming up and taking it. Thanks again!
Thanks for a great article. One (possibly very stupid) question is how do you actually identify the jib halyard?
We have three halyards running out the top of the mast:
1 A line spliced to a wire halyard that is currently clipped closest to the roller furling running to the port side clutches.
2. A line (all rope) currently clipped further aft, running to the starboard side clutches.
3. A thinner line (all rope) currently clipped at the mast, running to the port side clutches.
All lines lead aft, but identifying which one to attach to the head of the genoa…?
Hi Newbie – every boat is different and without seeing it, there’s no real way to tell. However, David’s GUESS is that it’s one of the two that come down the port side and an additional GUESS is that it may be the one spliced to the wire halyard. Maybe the easiest way to find out would be to take the end that would attach to the sail, walk it out and see which one comes out of the FRONT of the top of the mast. Our jib halyard went up & down over the front. We had a spare halyard that ran up the back and out the front of the mast. Sorry we can’t be of more help, but without seeing the boat, it’s almost impossible to tell. GOOD LUCK! Cheers! Jan & David
A very informative and well written article, along with the photos. Nit picking, I believe you mean “taut”, tightly pulled not “taunt’, teased. We have a Harken furler, probably a 1986 vintage?, The lower 6 inches keeps coming out of the aluminum foil, even tough there is great tension on the jib halyard. Any thoughts? Thanks for the info. Ed Schroeder Hunter 34
I have a Sabre 28 sloop. A 1979which I have owned for 10 years. The last few years I have a tough time put the Genoa on each Spring. The top 10’ is very difficult to raise. Once finally up the furler works fine. Why does it jam for raising the last 10 feet?
Hello, thanks for the informative article… I’m having trouble raising the halyard… the mechanism you said you “work” is not raising…. how do you work it? I feel like I’m going to break something if I winch it up any harder. Thanks for any info.
Hi Landon! Don’t “winch it any harder” – you are absolutely correct, winching it will break something! You should be able to slide the car up & down by hand. We “worked” it a bit by sliding it up & down by hand and fresh water flushing or adding a lubricant if absolutely necessary. If you can’t slide it up & down by hand, there’s another issue. Sorry we can’t be of more help, but without being there, we’re out of ideas. Cheers! Jan & David.