
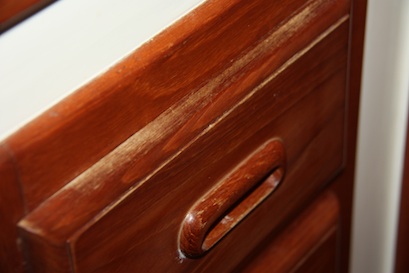
We are lucky to have solid teak staving inside our Passport 37… but it’s approaching 30 years old and all we’ve done is Murphy Oil clean and lemon oil twice a year. Don’t get me wrong, overall, it still looks great, but normal wear and tear is starting to show a bit of age. Here’s a good example, my top drawer in the head. This is where everything that I use everyday lives – my toothpaste, hairbrush, lip gloss, chapstick, etc. This drawer is usually opened several times a day. As a result, you can see that the satin interior rubbed varnish is starting to wear away.
My experience with the exterior teak and varnish has been that once it starts to break down, you have to do something immediately or it will deteriorate into a mess. I don’t want to lose the homey warm feeling in the salon.

Luckily for me, the wear and tear falls into two categories — first is just the wearing off of the varnish as shown in the drawer above. No dark spots, no water damage, nothing other than bare teak caused by wear and tear. That’s the category I decided to attack first. The second category includes dark spots, mostly around the teak trim on the refrigerator, the galley area and the companionway — places where moisture is more prevalent.
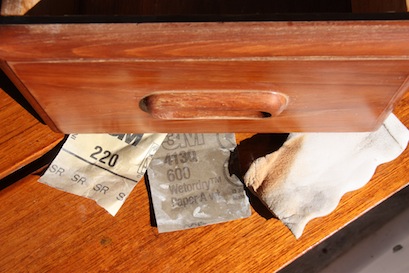
As when I decided to attempt exterior teak myself, I wanted to try a small test to see what damage I would do .. or if there was actually an improvement. So the top drawer became my test project. First I removed it from the inside of the boat — why get more dust below than absolutely necessary. Then I started sanding. Because it’s a relatively small area, I started with 220 grit sandpaper – hand sanding. Then I progressed to 600 grit wet sanding and finally I used a Magic Eraser to do the last bit of “microscopic” sanding. After each round of sanding, I cleaned up the drawer front.
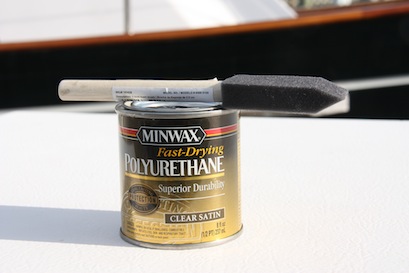
A trusted friend that knows a lot about varnish told me to try interior Minwax Clear Satin and see how it looked. We had no idea what was originally used on the boat in the yard in Taiwan in 1985, so… trial and error was the best we could do. I got the smallest can available and used a cheapo 1″ foam brush.
Before doing the actual varnish, I used tackcloth on the drawer front to remove any residual dust. Then, stirred the Minwax and VERY thinly brushed on a first coat. I must confess to being nervous about this step — I’d be able to tell with the first swipe if there was any chance this would be a bandaid that would help the interior or if it would just look patched and tacky. Luckily, the first swipe resulted in something similar to the rest of the drawer front. So I finished the front and let it dry for the recommended 4 hours.
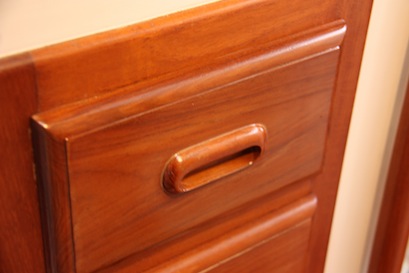
After 4 hours, I lightly sanded it again and added a 2nd coat. Here’s the result. I must confess to being pleasantly surprised. Now if the dark spots could be as easily resolved. Don’t get me wrong, there are lots of drawers and other spots that need this type of attention first. Unfortunately not all of them are removable, so I’ll try keeping my vacuum handy to suck up the dust as I sand.
Anyone else been through this? Is there something I could do easier or better? Please leave a comment and let me know! Cheers! Jan


I know they’re cheap and easy and everything, but… a foam brush? Eewww!
Sorry, just my perfectionist coming out – it really does look good in the photos! 🙂
We have a lot of interior teak that needs refinishing… when you sanded to strip the previous finish, did you take it all the way down to the wood or just to where you couldn’t see the “damage” anymore?
thanks!
Susan – so far on the interior, I’m just sanding to where the damage fades and then spot refinishing. I’m trying to decide what to do about the cabin sole though… it looks to me like I need to take it to bare wood and start over, but our “varnish artist” friend says to just sand it good and add two more coats. It’s always a challenge, which is one reason I try something in a very small (preferably out of the way) area just to see the results before I tackle something more obvious — like the companionway black splotches on the teak handrails. Teak is never-ending, but I do love the way it looks when it’s looking good! Cheers! Jan
Thanks Jan! Sanding just to where the damage fades sounds much less daunting to me! I enjoy reading your blog…
We are in similar circumstances with a boat in Florida (Melbourne) and staying close to home to care for beloved elderly parents.
Hope to see you out there! But if you are ever in Melbourne, give us a shout!
“We had no idea what was originally used on the boat in the yard in Taiwan in 1985”
Sounds like you got it in one! Thanks for the write-up, I’m about to tackle a similar project on my 1983 Ta Shing Orion 50.