Does anyone else have a boat with puddling portholes? If you have them, you know exactly what I mean. For those lucky enough that your boat doesn’t have them, I’m talking about portholes with frames that tilt in at the bottom – insuring that even a bit of rain … or even a heavy dew … will leave my toes soaking wet under the porthole. My galley porthole over the stove is generally a great place for ventilation … until there’s the slightest bit of rain and then it’s one continuous waterfall right onto the stove below. Obviously whoever engineered these porthole frames has never lived on a boat! Grumble grumble…
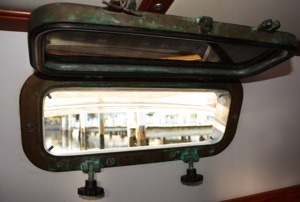
For the past 10 years we’ve lived with the hassle. A couple of times we tried to improvise to keep water from puddling in the porthole … one brilliant idea we had (after we saw another boat do it in Shelter Bay Marina/Panama – where torrential downpours are legendary) was to use a flexible clear cutting board, cut it to the correct size and adhere it to the porthole with blue tape. It actually worked pretty well – we engineered a few of them before we got the dimensions right, but ultimately the tropical sun cracked them in a matter of a few weeks. Oh well …
We had been steadfastly refusing to spend money on the “real” thing — with an almost 30 year old boat, there are way more things to spend money on than keeping the puddles out of our portholes. But finally after waking up in the wee early morning hours with a shockingly cold puddle the size of Lake Michigan where my feet should be in the bed I was convinced to buy a couple as a test.

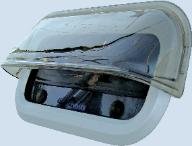
The “real thing” is a lexan PortVisor from the great folks at Seaworthy Goods. We ordered two to test the two biggest porthole offenders – the one by my feet and the one over the galley stove.
Here you can see our “test” … since it didn’t rain for a week, we decided to turn the hose on it to see if it kept the water out of the bottom lip. And LOOK — it’s cascading off the Portvisor and onto the deck, completely missing the bottom lip. WooHoo! It WORKS!
So we ordered enough to go around. They’ve been on a month and we haven’t knocked them off yet — they protrude about 3 inches from our cabin top, but so far they haven’t caught a line or a been knocked off by a clumsy sailor … aka ME! 🙂
Here’s how we installed them, based on the instructions from the folks at Seaworthy Goods:
Step 1: Clean around the outside of the porthole – any dirt, wax or anything on the cabin top can ruin the 3M super-power adhesive. If you want, you can screw them on, but we decided to try the adhesive first. We just used plain ole Ivory soap, water and a sponge.

Step 2: Use the little red scrubby pads that come with the PortVisor kit to remove any wax or any other kind of buildup on the cabin sides – the PortVisors stick best to clean gelcoat. I didn’t think our almost 30 year old cabin top had any wax or shine left on it, but using the scrubby pad, it was clear that our cabin sides weren’t as oxidized as I thought — good news!
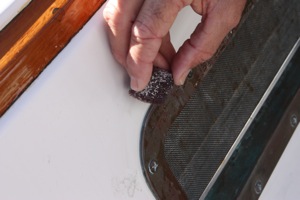
Step 3: Dry the area completely and then use isopropyl alcohol to make sure you’ve removed all the dust or other contaminants, like any unseen finger oils. Let it dry again. Seaworthy recommends using isopropyl alcohol since it is the least destructive solvent and won’t damage/soften any types of paints (or gelcoat). It’s what the 3M techs recommend first. Finger oils are one of the worst offenders to get a good lasting bond.

Step 4: Hold the PortVisor in place and mark where you want to stick it — once you remove the red protective covering from the 3M commercial grade sticky stuff, you won’t be re-positioning the PortVisor! A simple helper for correct alignment is to mark the position with masking tape, which is easy to see when affixing the PortVisor.
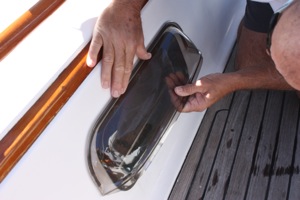
Step 5: Remove the Red Protective Covering from the industrial strength sticky stuff.

Step 6: Make sure you don’t accidentally stick it to anything you don’t want it stuck to! Position it lightly against the cabin top to make sure it’s where you want it.

Step 7: Now press it FIRMLY in place! The PortVisor instructions specify that it’s OK to LEAN on it, pressing as hard as you can. The PortVisor is made of tough lexan and it’s not going to break. Apply continuous pressure until you’re sure it’s attached.
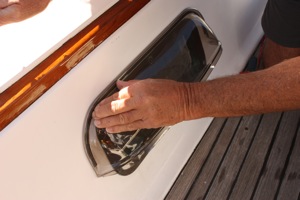
And you’re DONE! No more freezing cold wet spots on my sheets where my feet should be and no more cascading deluges onto my stove from rain or merely washing the boat and not drying out the porthole puddles enough. 🙂
We’re happy we finally decided to get the PortVisors after trying to jerry-rig our own for so many years. Do you have another solution for puddling portholes? Please leave a comment and share with everyone! Cheers! Jan




Thanks, Jan, for adding these detailed instructions to your invaluable website. We’re delighted that PortVisors will help make your cruising more comfortable.
Thanks Paula! It was my pleasure – we love our PortVisors & we’re only sorry we waited this long to put them on! Cheers! Jan
The 3M tape works extremely well. However, to make it work even better you can use 3M 94 primer. It is available in break sticks like ammonia capsules. Mark your area off with tape like said before and apply the 3M primer directly to where the tape will bond to. It helps to promote adhesion to the surface. You can find them on eBay.
Jan,
It’s been several years since you installed these. How did they hold up? Would you do it again? I’m thinking of buying them for our boat.
Tami — we kick ourselves for not installing them before we left for the Western Caribbean. We always thought they looked clunky and that with our narrow sidedecks we’d trip over them. For our boat, they are perfect in allowing us to leave the portholes open in drenching downpours – unless the rain is blowing literally sideways under the bottom half. Don’t spray them with insect repellant – I sprayed the porthole screens trying to keep out noseeems in Little Shark River one year and they’re no longer clear. Originally I bought a couple to try over the bed and stove, then liked them so ordered enough for the entire boat. They don’t look all that streamlined, but we’re more about practical than looks after being stuck in one too many stalled troughs in the Bay Islands & beyond. 🙂 Cheers! Jan
Thanks Jan, I think I’ll give them a try.